Bài đăng

Đang hiển thị bài đăng từ 2018

Tool Auto Sub Trên Windows

Hình ảnh
Chào các bạn. Hôm trước mình đã giới thiệu các bạn tool để tạo sub tự động trên linux rồi. Tiếp tục hôm nay mình sẽ share 1 script nhỏ của mình tạo để mà tạo sub english tự động. Đầu tiên các bạn cần cài đặt python. Mình recommend python 2.7 nha Sau đó, các bạn tải file nén rar của autosud của 1 bạn share trên diễn đàn dạy nhau học.  link here Giải nén ra được như thế này: Tới bước này, là bạn đã có thể sử dụng được rồi nha. (nếu có cần cài đặt thêm ffmpeg hay một số aps khác nữa thì các bạn xem trên mạng cài giúp mình). Nhưng mục đích của mình không phải thế. Mình lười và mình muốn nó tạo tự động cơ :)) Thế thì tới tool auto thôi :)) Code autosub dành cho windows ở đây nhe:  link here Sau đó, gõ lệnh và tận hưởng: Các bạn có gì thắc mắc thì cứ inbox mail cho mình nha. Hihi ^^

Nếu bất chợt một ngày, bạn phát hiện một người tuy cùng tuổi với bạn, nhưng lại giỏi hơn bạn rất nhiều, bạn sẽ cảm thấy như thế nào?

Nếu bất chợt một ngày, bạn phát hiện một người tuy cùng tuổi với bạn, nhưng lại giỏi hơn bạn rất nhiều, bạn sẽ cảm thấy như thế nào? Suy nghĩ và thực hiện. Right now !!!

[Solve] Kali Linux Login Loop Problem! Fix

My document.  You can see here. You should like, share and comment your feedback in your video. Firstly, I was broken by me when I delete only one language. But I don't know what way to fix it. And I must install it again, and don't have a way to recover my data. I will take you the way to fix it. Reason: Maybe, Your operating is broken when you are updating and upgrading your system that is not complete. And you shutdown. Solution: Start operating normally, When the login screen appears. You click Ctrl + Alt + F2 (For me, It is ok). You can try from F1 to F12 if F2 is not ok. And for connecting the Internet, you must update and upgrade your system again. It is ok for me. If you have a problem concern about it. Feel free to send me an email. Tks you very much. See you soon.

[Solve] VMware Workstation and Device/Credential Guard are not compatible. VMware Workstation can be run after disabling Device/Credential Guard. Please visit ...

I consult  this video . And now, I will share with me the solution. Search for "Run" and type "gpedit.msc" in that Goto    Local Computer Policy - Computer Configuration - Administrative Templates - System - Device Guard - Turn on Virtualization  Double click that .... and select "Disable" ... Go to Control Panel - Uninstall a Program - Turn Windows features on or off - (uncheck/turn off) Hyper-V. Click OK Select Do not restart. And then type the following cmds in cmd prompt.. to Delete the related EFI variables from the BCD file... Launch cmd as admin... bcdedit /create {0cb3b571-2f2e-4343-a879-d86a476d7215} /d "DebugTool" /application osloader bcdedit /set {0cb3b571-2f2e-4343-a879-d86a476d7215} path "\EFI\Microsoft\Boot\SecConfig.efi" bcdedit /set {bootmgr} bootsequence {0cb3b571-2f2e-4343-a879-d86a476d7215} bcdedit /set {0cb3b571-2f2e-4343-a879-d86a476d7215} loadoptions DISABLE-LSA-ISO,DISABLE-VBS bc

[Raspberry] Triển khai Web application trên Raspberry Pi Part 6

Trong bài này, mình sẽ hướng dẫn các bạn cấu hình data SQLite3 hiển thị trên webserver. 1. Download sqlite3 trên raspberry: sudo apt-get install sqlite3 2. Chỉnh sửa file env_log.py như nội dung bên dưới: import sqlite3 import sys import Adafruit_DHT def log_values(sensor_id, temp, hum): conn=sqlite3.connect('/var/www/lab_app/lab_app.db') #It is important to provide an #absolute path to the database #file, otherwise Cron won't be #able to find it! curs=conn.cursor() curs.execute("""INSERT INTO temperatures values(datetime(CURRENT_TIMESTAMP, 'localtime'), (?), (?))""", (sensor_id,temp)) curs.execute("""INSERT INTO humidities values(datetime(CURRENT_TIMESTAMP, 'localtime'), (?), (?))""", (sensor_id,hum))

[Raspberry] Triển khai Web application trên Raspberry Pi Part 5

Để làm được bài này các bạn phải làm được  Raspberry Kết Nối Cảm Biến Độ Ẩm, Nhiệt Độ . Cái này phụ thuộc rất nhiều vào cảm biến.  OK, Nếu các bạn đã làm được thì mời các bạn đọc tiếp :D  1. root@raspberrypi:/var/www/lab_app# gedit lab_app.py 2. Copy nội dung file  này  vào trong file lab_app.py 3. root@raspberrypi:/var/www/lab_app/templates# gedit lab_temp.html 4. root@raspberrypi:/var/www/lab_app/templates# gedit no_sensor.html 5. Copy nội dung của file  này  vào trong file no_sensor.html. 6. Chỉnh sửa file  lab_app_uwsgi.ini  :  root@raspberrypi:/var/www/lab_app# gedit lab_app_uwsgi.ini Nội dung chỉnh sửa(theo nội dung bên dưới): #Full path: /var/www/lab_app/lab_app_uwsgi.ini [uwsgi] #application's base folder base = /var/www/lab_app #python module to import app = lab_app module = %(app) home = %(base)/venv pythonpath = %(base) #socket file's location socket = /var/www/lab_app/%n.sock #permissions for the soc

[Raspberry] Triển khai Web application trên Raspberry Pi Part 4

Bài này mình sẽ tiếp tục hướng dẫn các bạn cấu hình từng bước, các bạn thực hiện theo mình nhé. 1. Tạo thư muc: root@raspberrypi:/var/www/lab_app# mkdir templates 2. root@raspberrypi:/var/www/lab_app# cd templates 3. Chỉnh sửa file: root@raspberrypi:/var/www/lab_app/templates# gedit hello.html 4. Copy nội dung của file trong  này  vào trong file hello.html 5. Chỉnh sửa file: root@raspberrypi:/var/www/lab_app# gedit hello.py 6. Copy nội dung ở dưới vào trong file hello.py from flask import Flask from flask import render_template app = Flask(__name__) app.debug = True @app.route("/") def hello(): return render_template('hello.html', message="Hello World!") if __name__ == "__main__": app.run(host='0.0.0.0', port=8080) 7. Open server: root@raspberrypi:/var/www/lab_app# python hello.py Mở browser và nhập vào địa chỉ http://ipraspberry:8080 Bài sẽ dừng ở đây. Hẹn bạn part tiếp

[Raspberry] Triển khai Web application trên Raspberry Pi Part 3

Mình sẽ tiếp tục hướng dẫn các bạn cấu hình Web Server trên Raspberry. 1. Tạo thư mục:  1 root @raspberrypi : / var / www / lab_app # mkdir static 2. Tạo thư mục: 1 root @raspberrypi : / var / www / lab_app / static # mkdir css 3. Tạo thư mục:  1 root @raspberrypi : / var / www / lab_app / static # mkdir images 4. Chỉnh sửa file:  1 root @raspberrypi : / var / www / lab_app / static # gedit a_static_file.html 5. Copy nội dung dưới đây vào trong file. 1 2 3 4 5 6 7 8 9 < html > < head > < title > Static page </ title > </ head > < body > < h1 > This is an example of a staic page </ h1 > < p > Neat, isn 't it?</p> </ body > </ html > 6. Mở browser, nhập vào http://ipraspberry/static/a_static_file.html 7. Download file skeleton ở  đây và sau đó giải nén file ra, copy 2 *.css file trong thư mục Skeleton-x.x.x/css/ vào trong thư mục /

[Solve] Cấu hình WebDAV trên Linux

Hình ảnh
Nếu bạn nào tiếng anh tốt thì có thể theo dõi ở link này:  link Mình cấu hình để phục vụ trong quá trình học tập ở quyển sách  Penetration Testing: A Hands-On Introduction to Hacking . Hệ điệu hành: Kali Linux 2018.2(Debian). WebDAV là viết tắt của cụm từ Web-based Distributed Authoring and Versioning (tạm dịch hệ thống quản lý chứng thực và phiên bản dựa trên môi trường Web) là một trong những sáng chế của tổ chức IEFT. Khái niệm này cũng được hiểu là một tập hợp những mở rộng của giao thức HTTP - một tập hợp các chuẩn cho phép những người dùng có thể hợp tác sửa đổi và quản lý nhiều file trên những web server từ xa. Các bạn làm theo mình nha: 😋😋😋 Thêm user mới khi đăng nhập. Update và cài đặt các gói cần thiết Tạo thư mục chứa file hệ thống và cấp chủ sở hữu Khởi động service apache2 Khởi động lại service apache2 Tạo file với nội dung là "this is a sample text file" Cài đặt gói apache2-utils Thêm user để truy cập

[Raspberry] Triển khai Web application trên Raspberry Pi Part 2

Các bạn làm theo mình nhé: :) 1. Cài đặt thư viện cho python. 1 pip install uwsgi 2. Chỉnh sửa file  /var/www/lab_app/lab_app_nginx.conf. 1 2 3 4 5 6 7 8 9 10 11 12 13 14 15 16 17 18 #Full path: /var/www/lab_app/lab_app_nginx.conf server { listen 80 ; server_name localhost; charset utf - 8 ; client_max_body_size 75 M; location / static { root / var / www / lab_app / ; } location / { try_files $ uri @labapp ; } location @labapp { include uwsgi_params; uwsgi_pass unix: / var / www / lab_app / lab_app_uwsgi . sock; } } 3. 1 ln - s / var / www / lab_app . nginx . conf / etc / nginx / conf . d / 4. Chỉnh sửa file lab_app_uwsgi.ini, nội dung như 5 nhé. 1 vim lab_app_uwsgi . ini 5.  1 2 3 4 5 6 7 8 9 10 11 12 13 14 15 16 17 18 19 20 21 22 23 24 #Full path: /var/www/lab_app/lab_app_uwsgi.ini [uwsgi] #application's base folder base = / var / www / lab_app #python modu

[Raspberry] Triển khai Web application trên Raspberry Pi Part 1

Hình ảnh
Mô hình: Các bạn làm theo mình nha: 1. 1 sudo apt - get install nginx - y 2. 1 / etc / init . d / nginx start 3. Sau đó mở trình duyệt lên và gõ vào địa chỉ ip của Raspberry. Muốn xem địa chỉ ip của Raspberry, bạn chỉ cần gõ vào terminal: ifconfig 4. 1 mkdir / var / www / lab_app 5. 1 cd / var / www / lab_app 6. 1 pip install virtualenv 7. 1 virtualenv venv 8. 1 . venv / bin / activate 9. 1 pip install flask 10. 1 vim hello . py hoặc 1 gedit hello . py 11. Copy code dưới vào trong file hello.py 1 2 3 4 5 6 7 8 9 10 11 12 from flask import Flask from flask import render_template app = Flask(__name__) app . debug = True @app.route ( "/" ) def hello (): return render_template( 'hello.html' , message = "Hello World!" ) if __name__ == "__main__" : app . run(host = '0.0.0.0' , port = 8080

[Solve] Mất màn hình sau khi cài đặt Hệ điều hành cho Raspberry pi

Tag:  Blank screen after installing Raspbian Các bạn làm theo mình nha: + Mở terminal +  sudo passwd root( Nếu lần đầu bạn chưa có mật khẩu của root ) + gedit /boot/config.txt    + Xóa dấu # ở dòng  hdmi_drive=1( hdmi_drive=2, nhưng bỏ 2 = 1 )    + Xóa dấu # ở dòng  hdmi_force_hotplug=1 Reboot lại và ok. Nếu có thắc mắc cứ pm cho mình nha ;) 

[Raspberry] Raspberry Kết Nối Cảm Biến Độ Ẩm, Nhiệt Độ

Hình ảnh
Các thiết bị: +  Dây Cắm Test Board Đực Cái 30cm (40 Sợi) +  Cảm Biến Độ Ẩm, Nhiệt Độ DHT22 +  Test Board Cắm MB-102 + Điện trở 10kOhm Sơ đồ: Sơ đồ Hình 1 Hình 2 Hình 3 Sử dụng: + Mở ternimal:  wget https://github.com/adafruit/Adafruit_Python_DHT/archive/master.zip + Gõ vào terminal: unzip master +   Gõ vào termianl: cd  Adafruit_Python_DHT/ + Gõ vào terminal: sudo python setup.py install + Gõ vào terminal: cd examples/ + Gõ vào terminal: python  AdafruitDHT.py 2302 17 OK. See you soon.

[Raspberry] Raspberry Kết nối với LED và Button

Hình ảnh
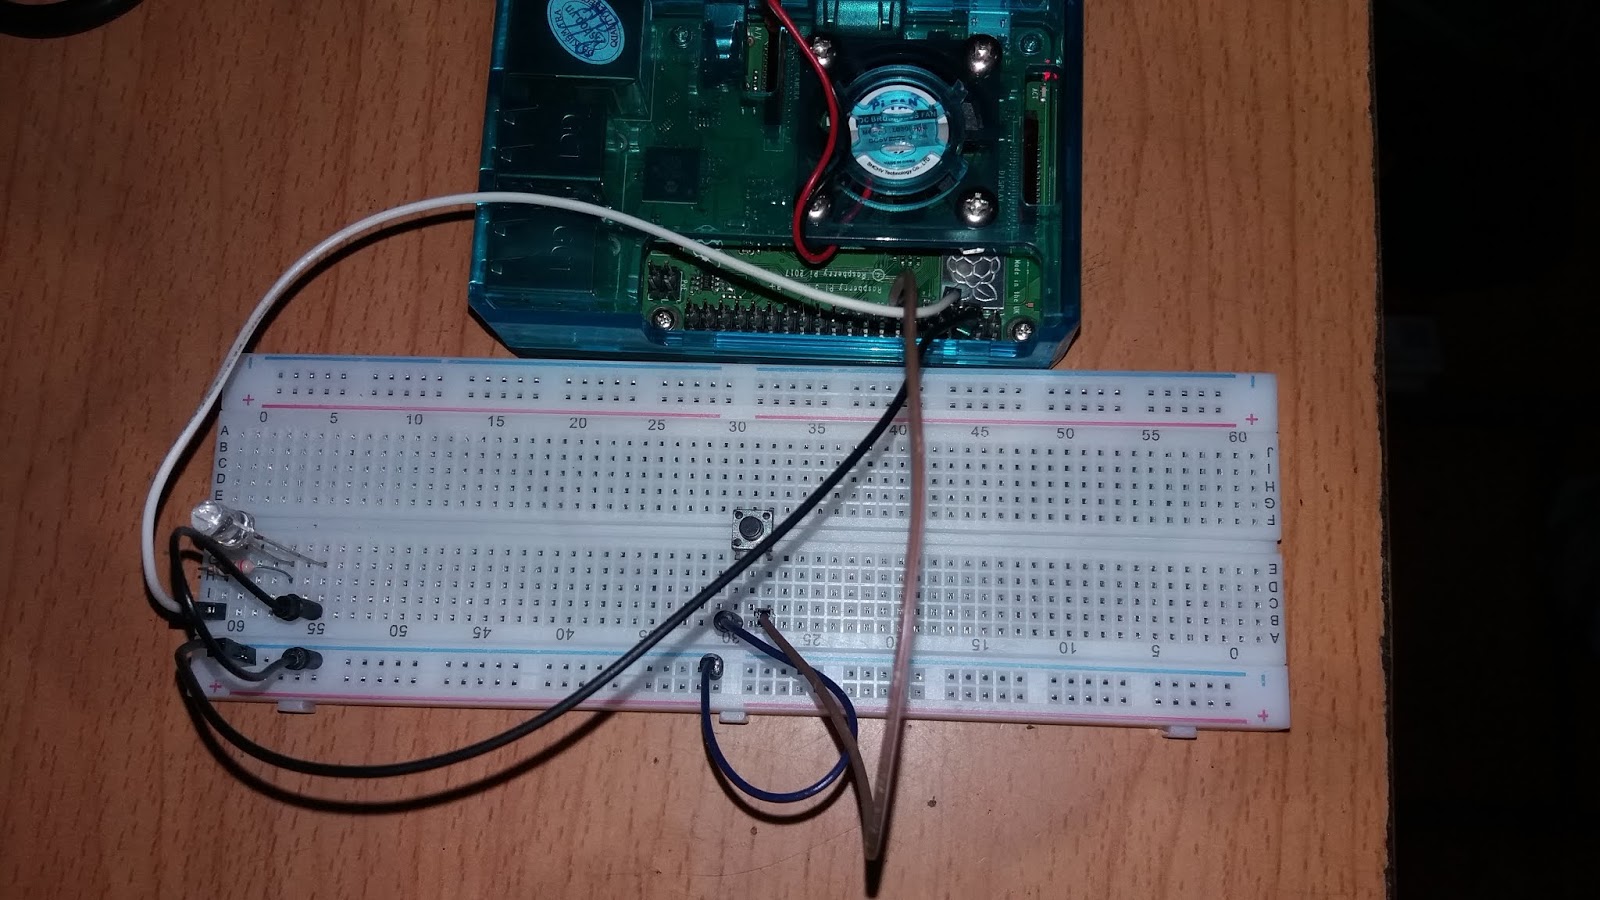
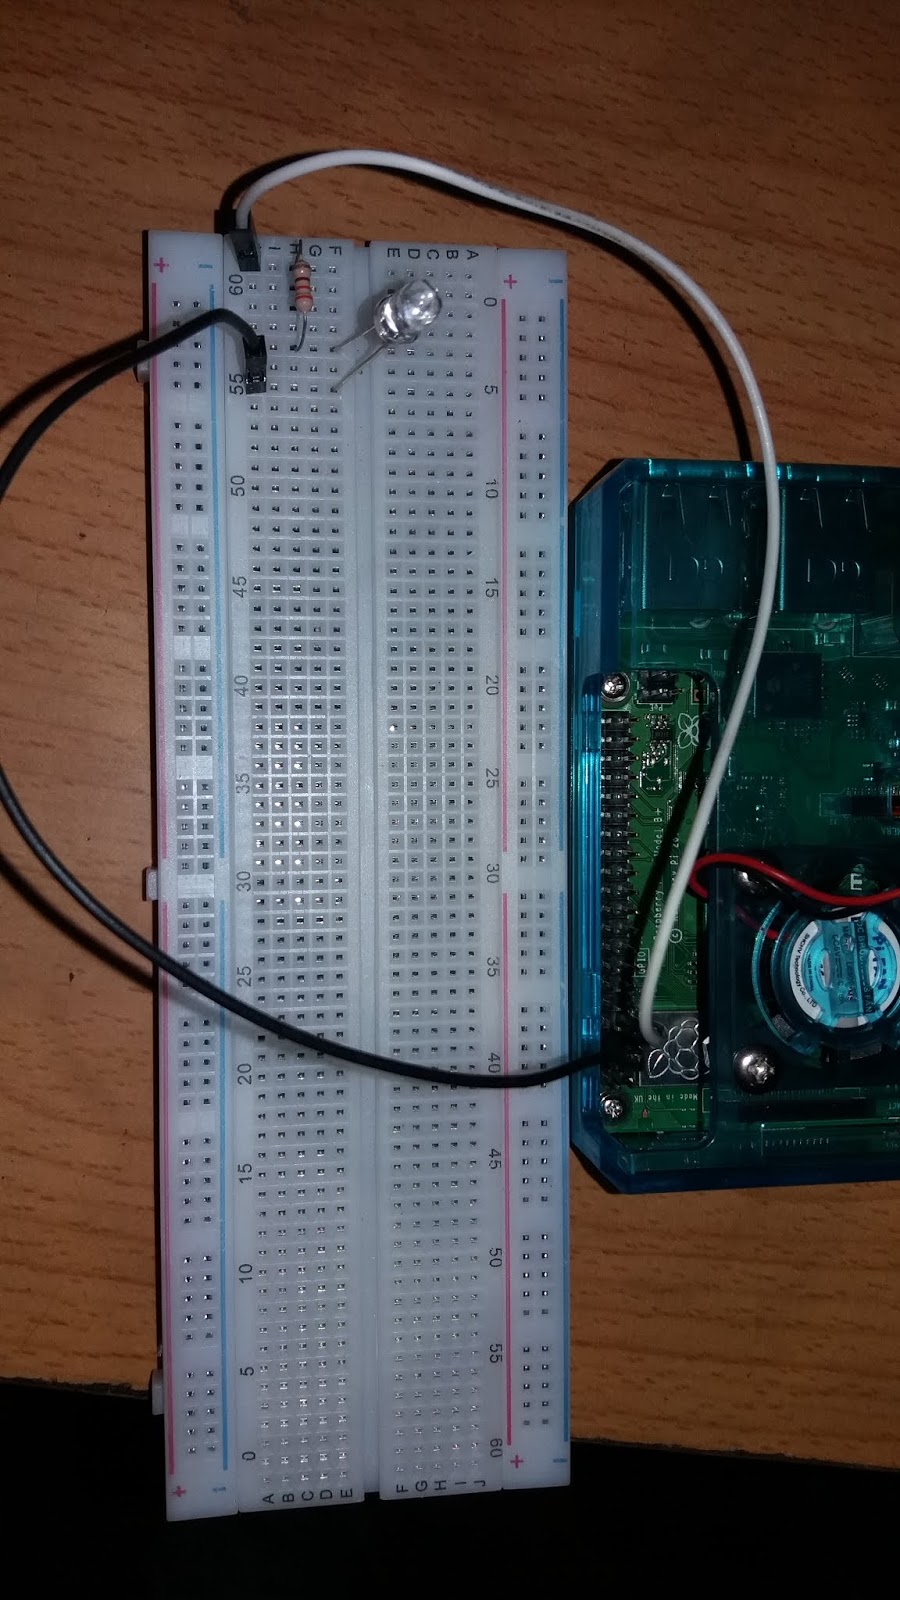
Các thiết bị: +  Dây Cắm Test Board Đực Cái 30cm (40 Sợi) +  Test Board Cắm MB-102 + 1 LED + 1 Raspberry + 1 điện trở 220 + 1 Button Hình 1 Hình 2 Hình 3 Code  here . Sử dụng: - Gõ vào ternimal, python buttonInput.py Bài sau mình sẽ hướng dẫn bạn kết nối với button và LED. See you.

[Raspberry] Raspberry Điều Khiển Led

Hình ảnh
Các thiết bị: +  Dây Cắm Test Board Đực Cái 30cm (40 Sợi) +  Test Board Cắm MB-102 + 1 LED + 1 Raspberry + 1 điện trở 220 Ảnh 1 Ành 2 Trái 4 Phải 3 Code  here . Sử dụng: - Gõ vào ternimal, python blink.py Bài sau mình sẽ hướng dẫn bạn kết nối với button. See you.

Using ICMPSH BACKDOOR

Hình ảnh
To do this pentest, you can have 2 packets: Download impacket:  link here Download icmpsh:  link here Virtual Machine: + Kali Linux 2018.2: 192.168.255.148 + Windows 7 32bit: 192.168.255.146 Firstly, you must copy 2 files into Kali Linux machine and un-compress 2 files. And after that, installing impacket in Kali Linux machine: Run this below command: For Windows 7 machine: And for Kali Linux machine: Supposedly I send ping with backdoor packet ... Copy file  icmpsh.exe in a folder in Kali Linux machine into Windows 7. And run this command: Wow, the result:  Detecting backdoors: A lot of packets are sent from victim to hacker. See you soon when I find out a subject attract anyone :)